Monday, November 23, 2015

Last weekend was clear (and cold) so we made the most of it and raised the section, called a "bent", of the timber frame shed.  It's been a very long project but I've always been interested in how old timber framed barns were build and wanted to try my hand at it.  So since I didn't need another barn, this shed project seemed like a good alternative.  The plans were from a book I purchased and several years ago I found a local independent sawmill to cut the wood to spec.  Then I let the wood dry for a year or so then started the project which has been ongoing for the past few.  For the most part it's been a winter project.  Here's a few pics of the raising.....
The main timbers are 8x8 and darn heavy

But with the gin pole and a block and tackle the raising was manageable

SUCCESS!

Wednesday, October 14, 2015

It's been quite a while since my last post.  Well, that's because I haven't been working on the tractor but have shifted back to my timber frame shed project that I've been chipping away at for a few years now.  I'll post some pics of that later.  We had a pretty nice day today so I spread a load of composted horse manure with the old JD Manure spreader that I restored a number of years ago.  I bought it from a guy a few miles from here for a couple hundred dollars.  It was in rough shape but mechanically it wasn't too bad.  Here's what it looked like when I bought it.

The old wood was replaced with new (and what seemed like a thousand bolts), it got cleaned primed and painted and got new tires.  The new tires cost much more than I paid for the whole thing.  During the restoration Stephanie referred to it as "my girlfriend" because she felt I spent more time with it than her.  I begged to differ but that was a losing argument.  Here's what it looks like now in action.

Sunday, August 30, 2015

Good news!  Apparently the pieces of bearing that were found when we changed the differential oil were remnants from an earlier failure that Frank had fixed.  This is one of the few times I was happy to have done a lot of work for nothing.  The cover was darn heavy so I used the boom lift and the Ford 861 to help with the lifting.  Here's the cover, you can see the gear shift fingers sticking out the bottom.


 Here are a couple of pics of what it looks like inside the belly of the beast.
Some mighty big gears in the rear end
The Transmission

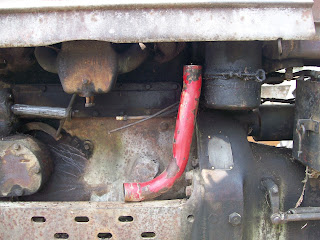
Upon inspection all the bearings appeared to be in place and intact with no more "spare" bearing parts laying about.  After cleaning things up a bit Fenn helped me put the cover back on.  It was a bit of a rush since a storm was coming and I didn't want to have everything open to the elements and of course it was a challenge to get the finger lined up with the gears and the cover had to slide down perfectly level or it would bind on the pins that aligned it.  We poured in the six gallons of oil and called it good.  That storm left us without power for about eight hours.  That was all yesterday; today I started putting everything back together.  Got the gas tank and the steering all back on as well as making a new breather tube for the air cleaner.  This was the tube that goes from the head to the air cleaner.  The existing one had a couple big holes in it and wasn't attached to the air cleaner because the part of the old air cleaner was missing (why I needed to get a replacement).  The old breather tube was made of steel but I made the new one out of copper which will not last nearly as long but was much easier to make.  The last thing I need to do is put on the "new" ampere meter box and connect it and the starter button then she should be running again.

Last week before the weather turned bad Stephanie's sister Stacy and her daughter Brittany came over for a pony drive.  Pippin was a gentleman and treated everyone well.  He seems to really enjoy his time driving.

Stephanie and Stacy

Brit driving the great beast


Stacy and Brit

Wednesday, August 26, 2015

The last post was actually from a couple weeks ago, forgot to hit "publish" so it's dated August 26th instead of August 9th.  Since then we've been taking parts off so we can get into the transmission to see if the bearing parts were left over from a previous failure that's been repaired (I hope) or from an existing problem that needs our attention.  To get into the tranny the seat, the steering column, and the gas tank came off.  Of course there was a learning curve to all of them so next time it will go much faster.  Today Fenn and I took off the belt pulley gearbox that sits on top of the transmission.  It simply unbolted and lifted off but it was darn heavy.

Fenn removing the belt pulley bolts
The belt pulley is just what the name implies; it's a pulley that is powered by the tractor and when  a belt is attached it can power any number of contraptions from sawmills, to threshers to peanut washers like pictured below.  This was a picture I found on the web.  You can see the wide belt going from the belt pulley on the tractor to a pulley on the peanut washer. 

Probably something Jimmy Carter was familiar with.........

Here's a picture of the belt pulley after removing from the tractor and a picture of the gears below.  From the looks of the gasket, it appears Frank has been in here before.  Hopefully that's a good sign.  We'll see tomorrow when we lift off the transmission cover.


So I posted the picture of the metal parts that I found in the bottom of differential case on the YTMag forum and the consensus was as I suspected; the parts were from a bearing.  One person had an interesting comment: Where's the ball bearings?  Good point, they should be in there still at the bottom of the case.  I need to get a magnate to slide in the drain hole and see what else is in there.  Additionally the consensus was to open it up and see what's going on in the transmission.  It's possible that the pieces remained in there from a previous repair that Frank may have done but that's probably wishful thinking.  Unfortunately getting into the transmission is no small task and will involve removing the seat, the steering column, the gas tank, the belt pulley and then remove a large heavy steel cover plate.  The first thing was to get all the rusted bolts loose related to all these parts so I was back to several days of spraying penetrating oil.  Today I was able to get everything loosened but the bolts on the cover plate were a real challenge as about half of them were very rusted and not their original size or shape.  Going down in socket size and switching between metric and standard sizes, pounding each socket onto the bolt when I found the right size allowed for a good grip on the bolt and its eventual removal.
You can see the loosened bolts here.  Under the steel plate is the transmission.
I'm not sure when I'll get to removing the seat, gas tank, etc., but since this isn't yet a working tractor time is a luxury I have for once.

Keeping an eye on EBay I found a few needed parts and since there were no other bidders the opening bid won.  So sometime this week the mailman should be delivering an Amp Box, and air cleaner and the cap that goes with it.  I was very happy with the price but shipping cost more than the parts - still a good deal.  The parts are coming from a guy in Wisconsin that is parting out an H.  Here's a picture of the Amp Box that I'll be replacing. 


I'll try to still use the existing face plate since all the ones I've seen for sale have not only the amp meter but also a dial below it for the lights.  This one doesn't have a hole for the light dial so apparently the tractor was not purchased with that option.  I hope to use the amp meter from the one I purchased if it works and then the box it goes in since this one is all corroded around the edge where the faceplate fits on (can't really see it from this pic). 

Here's a couple of pics from this year's hay crop.  The baler is a New Holland 271 that I purchased sixteen years ago for $400.  It took a bit of work but has been a pretty good baler for us since we only make about 600 bales a year.  It's one my newest pieces of equipment being built sometime between 1961 and 1963.

That's Eclipse wishing his neck was a bit longer

Wednesday, August 5, 2015

Got the new manifold and muffler on and beside dropping and losing a nut and having to go to town for a replacement it all went on just fine.  Today Fenn and I were going to change the oil in the differential.  The first challenge was figuring out how to open the fill plug.  It's located at your feet when driving and has a big square recess so you need something big and square to open it.  Here's what it looks like:

The recessed area is about 3/4 inches and I didn't have anything that size so I went to the hardware store and bought a plug that had the male version of this and with a little grinding it fit and by grabbing that with a pair of channel locks I was able to spin it open.  Here's the plug:


So far so good.  To drain the six gallons of oil from the differential there are two plugs; one below the PTO and the other by where the belly pump is supposed to be (it's missing from this tractor). Expecting there would be a fair amount of old crud in there I first poured in about a half gallon of kerosene and drove around for a bit to loosen things up.  Fenn pulled the first plug near the belly pump and the oil that came out didn't look to horrible, a bit of water but that was about it.  When he pulled the rear plug a lot of water came gushing out then some oil.  I'm guessing there was maybe four gallons total we drained.  When the rear area was finished draining I looked in the hole and saw something so I stuck my finger in and pulled out a bunch of metal pieces (crap!).  This can't be good.  The pieces look like they were part of a bearing.  I'll post the pics on the Yesterdays Tractor Magazine website and see what I can learn before replacing the oil.  I was hoping to not have to get into the transmission but that may now be in the cards;


The new manifold and muffler installed .... much quieter

Saturday, August 1, 2015

In anticipation of the new manifold and muffler arriving, last weekend Fenn and I took off the old manifold and finally this week the new ones arrived.    The manifold nuts holding on the old one were very rusted and I was concerned the studs would break off when trying to remove them so for the previous week or so I'd spray each with some penetrating oil.  The family got a chuckle when I'd tell them I was heading outside to put some penetrating oil on my nuts.  Anyway, three nuts came off and three studs came out of the block with the nuts tightly rusted to the threads.  I went to Tacoma Screw in Kent this week and picked up new studs to replace the three that came out.  The old manifold was in remarkably bad shape.  Here's another picture of the back side.  Not much exhaust was coming out the stack.


No wonder it was so loud 

Here's the new manifold and muffler that arrived.  Today I'll clean off the manifold and put some hi-temp paint on it.  I expect the paint to burn off the exhaust portion but hopefully the intake portion will stay cool enough to hold the paint.  We'll see.


Last weekend was really tough, we had to put down Agate, our 33 year old swayback horse.  In his younger years he was a competition and then schooling horse.  We bought him when he was fifteen and being retired.  He was a great riding horse that you could hop on bareback after not being ridden for a long time and he was a perfect gentleman.  Over the past few years his age was catching up with him and his back began to cause him problems.  Finally last weekend he began losing coordination in his back legs and was having a lot of trouble standing.  The vet came out early Sunday morning and said he wouldn't improve so we made the right but very difficult decision to put him down.  Eldon our neighbor that afternoon came over with his backhoe and we buried him out in the back of our hay field.

Rest in peace old friend, you will be missed.


Wednesday, July 22, 2015

I ordered new manifold and muffler off of ebay and they should be here next week.   The manifold that is on the tractor now is interesting (if manifolds can be interesting) since the tractor was originally designed to run on distillate.  There are two fuel tanks, a one gallon tank to get the engine running and warmed up and then a second 17 gallon tank for the distillate.  Once the engine was good and warm the fuel line was switched over to distillate tank.  So what does this have to do with the manifold?  The manifold for a setup like this has a heat control valve in it and the manifold is designed so the hot exhaust gasses pass around the intake manifold to heat up the incoming distillate fuel mixture so it properly vaporizes and burns efficiently.  The muffler on the other hand is more straight forward.  Currently there is no muffler and funny enough, the operators manual includes a muffler in the "special equipment" section.

Tonight Fenn and I did a compression test to see what kind of shape the engine is in.  Unfortunately the test results were a bit puzzling to me and didn't really line up with what I expected.  Since this is new territory for me I posted the test results and a question on the antique tractor forum I frequent (YTMag).  It's been an incredible source of information over the years so hopefully I'll get some sound advice on this one.  As far as the test goes, all four cylinders had 65 lbs of pressure plus or minus 2 lbs.  Consistent across all cylinders is good but consistently low.  The tester I'm using isn't a great tester so that may be an issue.  Then I squirted oil in each cylinder and tested it again and all were at 75 lbs.  Some difference between the wet and dry but not sure if the difference is enough to worry about.  I had expected the difference between the wet and dry test to be significantly different as Frank had said it burned a lot of oil and I thought the rings were the culprit.  So we'll see what the folks on the forum have to say.......

To keep things interesting here are a couple of pics from the farm.  Yesterday when I went to the barn to feed the horses I pulled a bale of hay off the stack to find a clutch of eggs from one of our wondering hens.  She apparently liked the privacy.  The other pic is of our pony Pippin. 


Is a pony 1/2 horse power??

Tuesday, July 14, 2015

It was a good news bad news day.  The good news is that the carburetor kit finally arrived so I could finish the work on it and get it back on the tractor.  Last weekend I drained the old gas out in case it was bad and put in some fresh.  With the overhauled carb back on the tractor I was going to crank it over but first had to figure out which way was "on" on the ignition switch.  A quick check with a tester answered that question.  With the switch on I hit the starter button and she turned over but no pop.  Tested for spark and there was none so checked out the points and discovered they were corroded so I cleaned them up and re-gapped them and cranked it over again.  This time it fired up almost immediately.  A little adjustment to the idle screw on the carb and she was running pretty good.  That was the good news, actually really good news.  Some smoke was coming from under the hood which turned out to be some cedar tree needles that had accumulated on the top of the manifold.  I took the hood off to clean it off and noticed a couple of gaping holes in the exhaust part of the manifold.  That was the bad news:  add a manifold to the shopping list.  So with the needles gone and the hood back on and air in the front tires it was time for a test drive.  Wow is that seat high in the air!  The Fords seats are down low between the back wheels but the H has its seat near the top of its much taller rear tires.  After the initial shock it was pretty cool driving it around up there and the view is great.  So aside from the manifold discovery it was awesome getting it running again.  Probably not that big of a deal really since it was running some time last year but all the same I was pretty pleased.
There's a matching hole on the opposite side


Just for comparison here are a picture of the '52 Ford 8N, notice how low the seat is. This was me last weekend moving the chicken coop to a new location.


That's Morgan riding herd on the hens


Friday, July 10, 2015

 
The new old grill arrived today and it appeared to be in good shape as advertised!  It has dzus fasteners to attach it to the chassis so if information on the web is correct it came off an earlier model H.  Apparently after serial number 49750 the grills were attached with four screws, which is how the present grill is attached.  Also, the serial number of this tractor is 111816.  As promised here are a few pics of the new grill: 
 

That's Agate checking things out.  He turned 33 this month and is still hanging in there (along with his back - and no, he's not ridden anymore).  The grill is just sitting in place and hasn't been attached - I just wanted to see how it looked.  Pretty good I'd say and it still has an open "mouth" at the bottom for Renae and Lani to feed it.  I'll get the insert that fits in that mouth at some point down the road. 

The carburetor kit hasn't arrived yet.  Hopefully it will tomorrow as I'd like to take a crack at getting her running this weekend.  For anyone wonder what the heck a dzus fastener is, here's a picture:


Monday, July 6, 2015


Now that the tractor is home the first thing I want to do is get it running to see what kind of shape the engine is in.  From talks in the past with Frank I’m guessing some major engine work will be in order.  He had commented on the amount of oil it burns so new rings and sleeves are likely in order and if I tear into it that much a complete overhaul may make sense.  But, first things first.

When we were picking it up I had tried to start it only to find that when the gas was turned on it just ran out of the carburetor (float stuck open?).  Obviously it didn’t start hence the reason for winching it onto the trailer.  So last week I ordered a carburetor overhaul kit from Mcdonald carb and a new set of spark plug wires (copper core and cloth coated like the originals) from Brillman.  Tearing into the carb it was clear it wouldn’t run in its present condition.  The screen that filters the gas coming into the carb, for example, was loaded with rust.  Hopefully the gas tank is not the same, I’ll check that later.  I also needed to get a new air pre-cleaner tube that goes from the carb to the air filter as it was missing.  Surprisingly I found one on eBay (gotta love eBay).
"New" tube from ebay
Carb cleaned awaiting rebuild kit


Getting a little ahead of myself on the project I also purchased a front grill off of eBay.  It looked to be in good shape but with some rust which shouldn’t be a problem as long as it’s not rusted through somewhere.  That set me back $120 but it cost an additional $68 to ship the darn thing from Connecticut.   Here's a picture of the present grill...a bit beyond repair.  I'll post a picture of the replacement when it arrives.
Also, here's a pic Stephanie took a few days back of our hay cutting.  We finished baling on July third.  Steph described the hot weather during haying this year as punishing.  Well put!
Cutting hay with the 1959 Ford 861


Sunday, July 5, 2015

In 1942, a then 18 year old Frank Mobius purchased a new Farmall H tractor to work his 132 acre farm in Lake Stevens Washington.  Sadly in the spring of 2015 at the age of 91, Frank passed leaving behind his wife Bette and daughters Renae and Lani.  My wife Stephanie is Frank and Bette's niece and years ago at a family gathering I had expressed my interest in Frank's old tractor.  Following the funeral service, the very tired beauty was offered to me. 

This will be the story of its restoration.............


The first step was to somehow get the tractor home so to see what we were up against on May 24th Stephanie our son Fenn and I drove from our home in Enumclaw up to Lake Stevens, about an hour and a half drive, to see what we were up against.  The tractor was parked under an old cedar tree and was accessible with a trailer so we just needed to wait for the ground to dry out to avoid getting stuck and we'd be in business.

On Father's Day, June 21st, we drove up with a trailer rented from Bunce in Puyallup.  I had trouble finding a trailer that was wide enough to accommodate the width of the rear tires.  It wasn't running so some chains and a couple of come-alongs and we were able to get her loaded.


Fenn was a great help in winching it onto the trailer.  With the tires loaded with water and calcium it's estimated weight is around 5,000 lbs.

Cousin Renae
Aunt Bette bidding the H farewell


Luckily we made the drive home without any major problems and got the trailer back before the rental yard closed with 1 minute to spare.